1. From the Setup menu of the Surveys & Tests service, click Create a Test
a. Select Online Test.
b. Select the Language. All instructions, warning messages and links will be displayed in the language selected. Note that your account must be setup with a template for each language selected.
c. Click Update & Next.
2. On the Setup Page
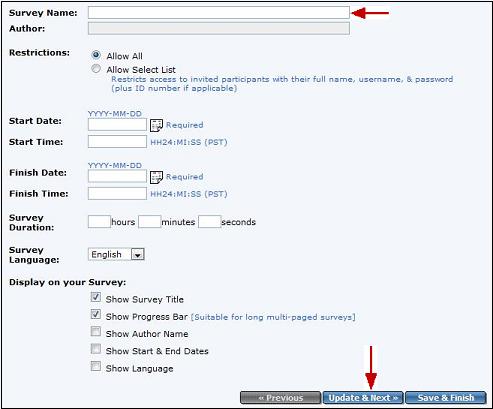
a. Test Name: Enter the name of your test. This name will be used for internal purposes only so that you can identify this test from your list of tests.
b. Author (optional): Enter your name in the second text field.
c. Restrictions (optional): Please select “allow all”.
d. Start & End Dates (optional): Enter the Start Date and End Date, using the YYYY-MM-DD format (e.g. 2006-11-20) or by clicking on the calendar icon to select your date. To view your test, the start date must be in the past.
e. Start & End Times (optional): You can restrict the start and end time by entering the time in the HH24:MI:SS format Pacific Time. For example:
-
-
f. Test Duration (optional): You can also specify the maximum Test Duration, if you are restricting your participants to a specific time limit from the start of the test process. For example: your test may be available for participation for a period of 1 week. However, if you specify a 1-hour duration, each participant must complete their test within 1 hour from the time they began the test. Note that the clock stops during periods of computer wait times to load pages. This prevents the penalization of participants with slow Internet connections.
g. Template Design: Your account has been automatically setup with a single template design for each language (such as version 1 = Survey.EN.v1.html). If your surveys are hosted on web pages with different designs, you have the option of setting up multiple template versions for one or more languages.
h. Display on your Screen: You can control the content displayed to your test takers at the top of each page of your online questionnaire:
-
-
Test Title as input by you on this page
-
Progress Bar to show respondents the number of pages left in your test. Only recommended when you have more than one page of questions.
-
Author Name as input by you on this page.
-
Start & End Dates as input by you on this page.
-
Language of the displayed test.
i. Click Update & Next
3. On the Messages page:
a. Welcome Message & Instructions: Shown to your participants on the landing page of your test. Instructions can include the general instructions and expected length of your test, along with your confidentiality policy relating to the use of their responses. With HTML code or the HTML editor, you can format the text, highlighting key points and adding line breaks for emphasis.
b. Closing Remarks: Provide your thank you messages that will be shown to your participants once they have successfully completed the test. With the HTML editor, you can also embed links, encouraging participants to click through to other web pages.
c. Click Update & Next
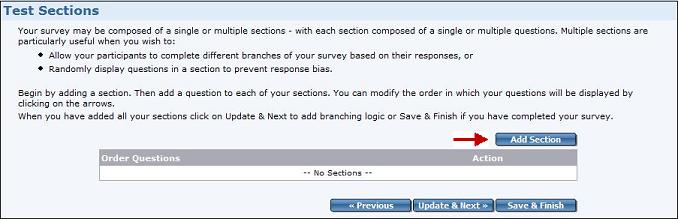
4. On the Design page, you must create at least one Section that will contain your questions. Click the blue Add Section button.
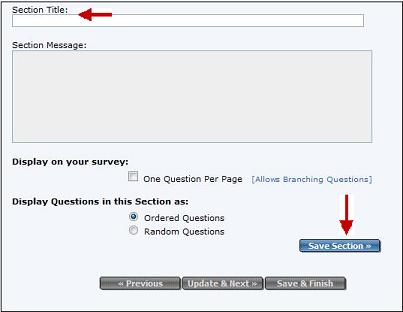
a. Section Title:Enter the name of the section for internal purposes.
b. Section Message (optional): Add a Section Message to provide instructions for completing the section.
c. Display on your test (optional): Check the box to have each question in this section displayed on a separate page. This is helpful if you would like to include branching logic, so that respondents are taken to a different question, after responding a specific way to a question in this section.
d. Display Questions in this section as (optional): The default setting displays your questions in the order you specify. Or you can randomly display questions in a section to prevent response bias.
e. Click Save Session.
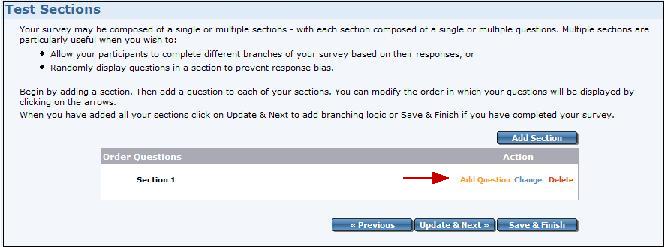
5. Next, add a question to a section by clicking Add Question beside the Section Name.
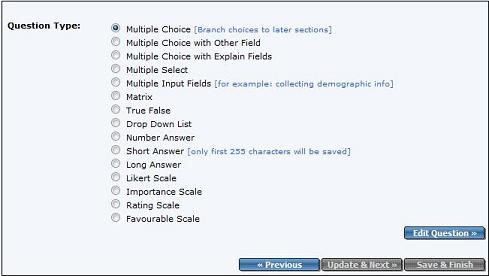
a. Select your question type and click Edit Questionto continue. To learn more about each question type click here or page down to section entitled “What Question Types can I use in a test?”
b. Question Title (optional): Enter a title to be used for internal purposes to identify your question in the section list. Or leave this field blank and the first few words of your question will be displayed as a title for internal purposes.
c. Question: Enter the actual text of the Question. You can include HTML tags to format your question, and include images that are automatically pulled in from your web site, etc.
d. Depending on the question type selected, follow the additional instructions by entering:
-
-
If applicable, the question choices.
-
An optional suffix for additional information, which appears at the very end of question.
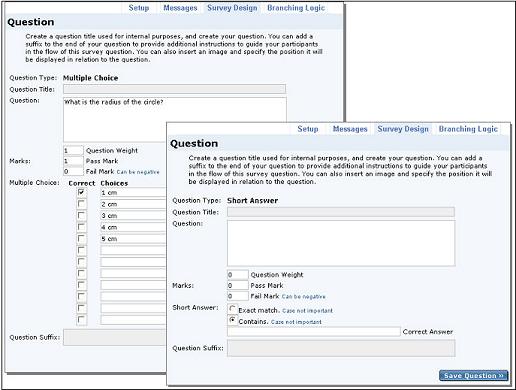
e. Specify the correct answer so that the system can automatically score responses. Open ended questions, such as short or long answers, can even include key words or phrases to pattern match. For pattern matched answers, the question will receive a preliminary mark which can be changed by the teacher upon review.
f. Attribute a scoring weight for each question.
g. Specify the passing mark if a student responds correctly.
h. Specify the failing mark if a student selects an incorrect answer.
i. Click Save Question
6. Repeat the process to add additional questions and / or sections. You can reorder the questions or section by click on the up or down arrows. When you have completed your test design, click Save & Finish
7. On the Branching Logic page, you have the ability to create a test which branches to another section depending on a respondent’s answer to a question. To create your branching logic, click on the Branch button located near the top of the input screen. For example:
-
-
If a participant answer no to question #3 in section 1, they can skip section 2 and be sent automatically to section 3.
-
The other participants, who answered yes to the same question, would continue on to section 2.
8. When you have completed your test, click Save & Finish.